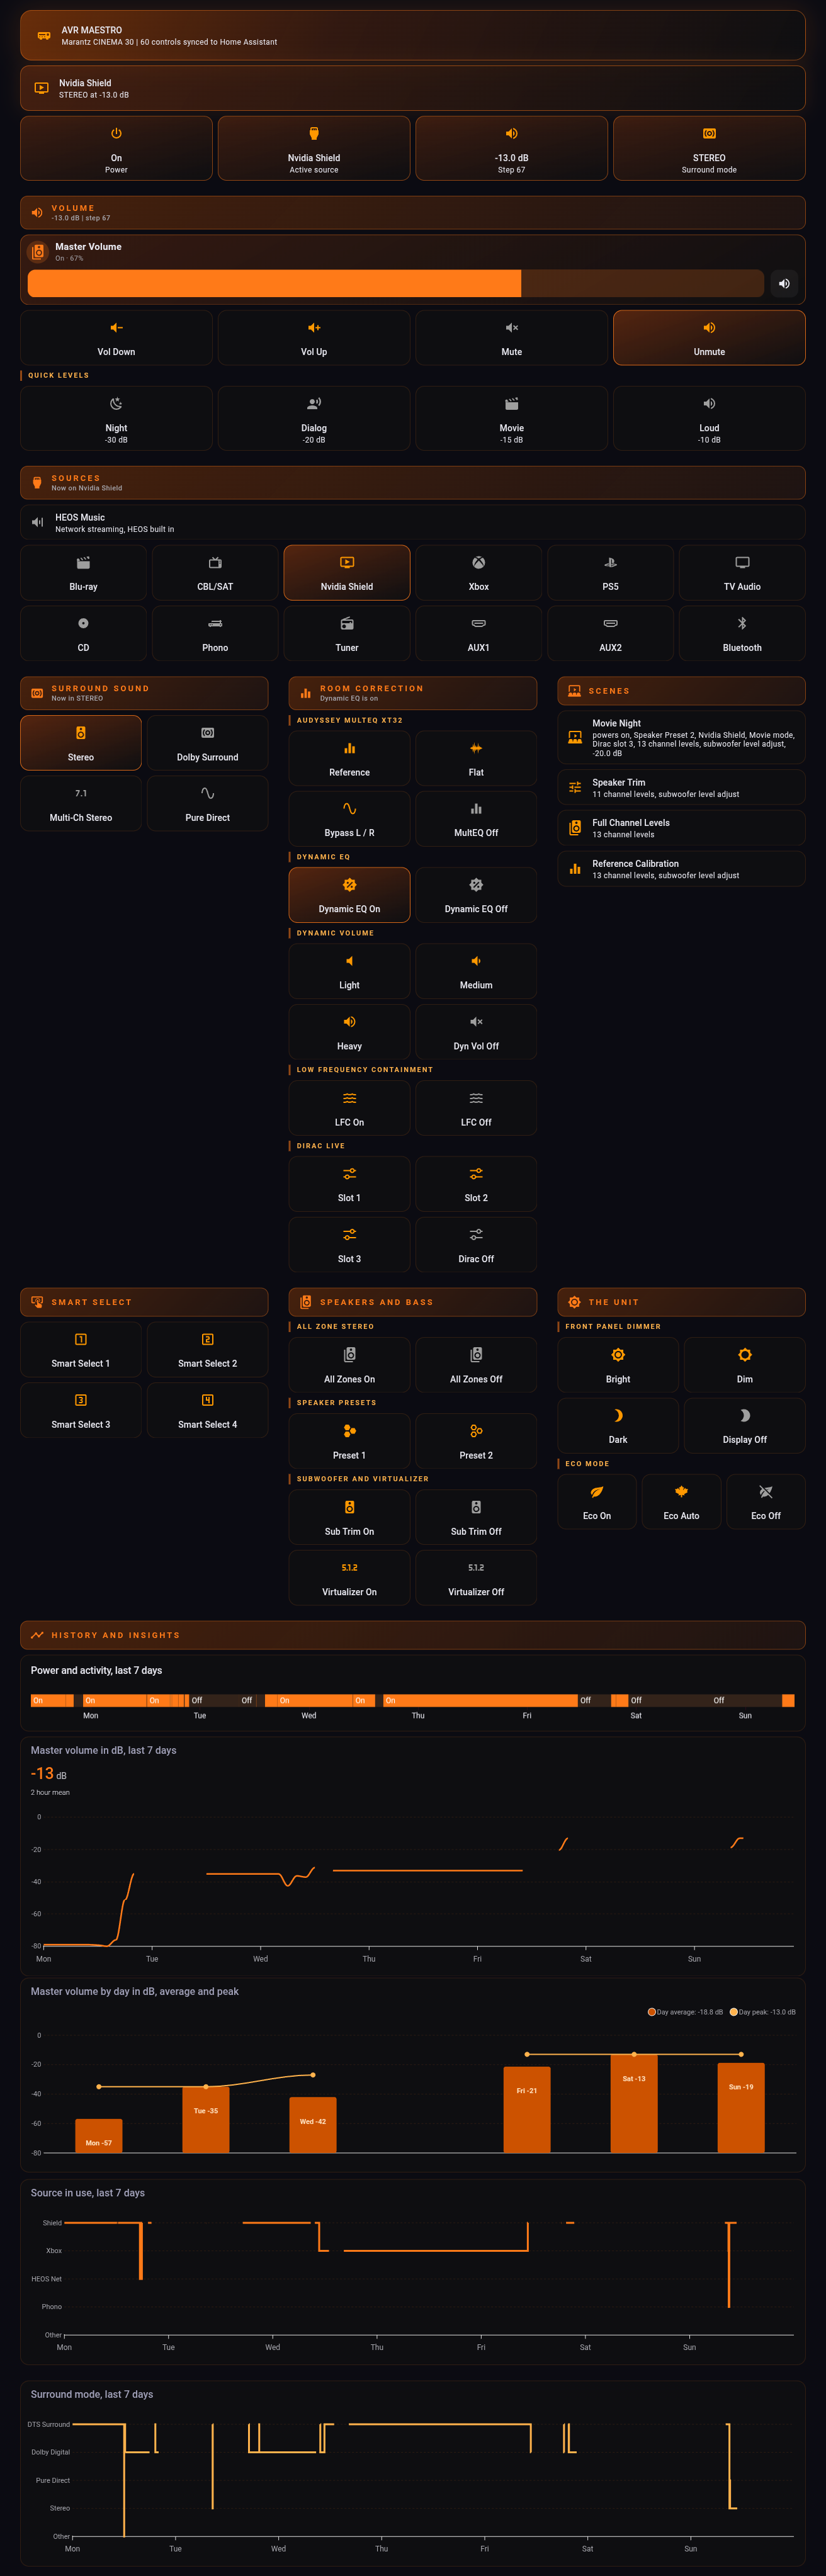
这个仪表盘有两个数据来源,下面每一步都要区分清楚。
| 来源 | 提供 |
|---|---|
| AVR Maestro 同步的脚本 | 所有控制项:输入源、环绕声模式、Audyssey、Dirac、Smart Select、预设、调光、节能、你的场景。 |
| Denon AVR 集成的媒体播放器实体 | 实时状态:电源、当前输入源、环绕声模式、音量、静音。 |
这四个都在 HACS 默认商店中。在 Home Assistant 中:HACS › 前端 › 探索 & 下载存储库,搜索名称,点击下载,然后刷新浏览器。
| 搜索 | 用途 | 如果跳过 |
|---|---|---|
| Mushroom | 所有控制磁贴和音量滑块 | 改用普通的 button 卡片。能用,只是外观更方正。 |
| button-card | 带实时标签的分区标题 | 改用 markdown 卡片,或普通标题。 |
| card-mod | 配色,以及当前激活磁贴的点亮状态 | 一切照常工作,只是没有任何点亮效果。 |
| apexcharts-card | 历史曲线图 | 改用内置的 history-graph 卡片。 |
本页的每段代码都用到两个占位符。先把你的找出来,剩下的就是复制粘贴。
media_player.your_receiver → 设置 › 设备 & 服务 › 您的接收机 › 媒体播放器实体。类似 media_player.marantz_cinema_30。script.avr_maestro_MAC_... → 开发者工具 › 状态,然后在实体筛选框中输入 avr_maestro。您的全部控制列表就会显示出来。每个脚本 ID 的中间部分都是接收机的 MAC 地址,十二个小写字符,所有脚本都相同。复制一次即可。本页中凡是写着 MAC 的地方,都换成你自己的。
unavailable 的项。旧版本是按接收机名称而不是 MAC 来命名脚本的。如果你当时同步过,这些旧脚本仍会列出,但已经失效。有效的是以 MAC 命名的那些。从现在起,每一步都是:添加一个分区,然后把卡片粘贴进去。粘贴 YAML 时,可使用卡片上的三点菜单并选择在 YAML 中编辑,也可使用仪表盘上的三点菜单,通过原始配置编辑器一次性粘贴全部内容。
# The view's own settings, if you prefer to type them
type: sections
title: AVR Maestro
icon: mdi:audio-video
max_columns: 3
dense_section_placement: true
先从面板上最简单的东西开始,这样在搭建任何复杂内容之前,你就能确认实体 ID 是否正确。添加一个分区,添加一张卡片,选择在 YAML 中编辑,然后粘贴:
type: button
name: Pure Direct
icon: mdi:speaker
tap_action:
  action: perform-action
  perform_action: script.turn_on
  target:
    entity_id: script.avr_maestro_MAC_mode_pure_direct
原生 Home Assistant,无需 HACS。
点一下它。如果接收机有反应,说明你的 ID 正确,下面的一切都能正常工作。如果没有反应,请回到第 2 步。
这是最值得学会的模式,面板上每个输入源和环绕声磁贴都是它的副本。卡片负责发送脚本,并根据接收机实体给自己上色,这样你当前所在的输入源会亮起,其他的则保持暗色。
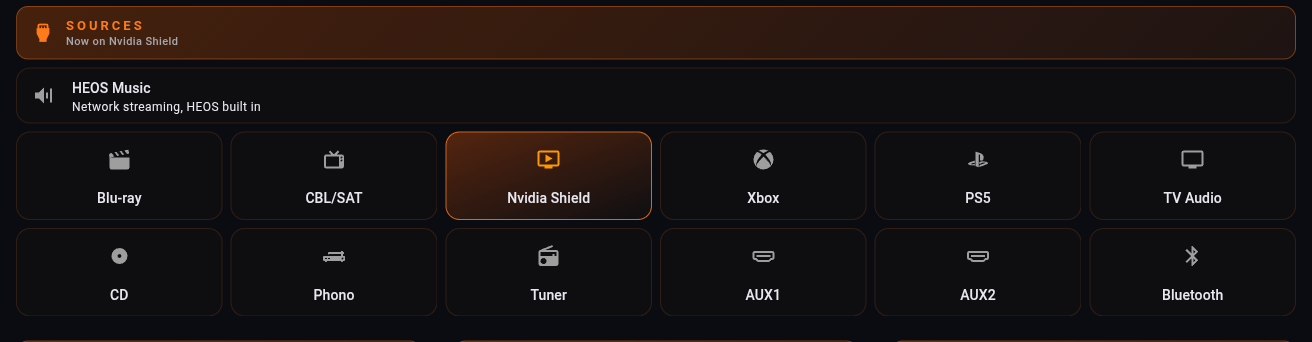
type: custom:mushroom-template-card
entity: script.avr_maestro_MAC_input_cd
icon: mdi:disc
primary: CD
icon_color: >-
  {{ 'orange' if (state_attr('media_player.your_receiver','source') or '')|lower
     == 'cd' else 'grey' }}
layout: vertical
fill_container: true
tap_action:
  action: perform-action
  perform_action: script.turn_on
  target:
    entity_id: script.avr_maestro_MAC_input_cd
card_mod:
  style: |
    ha-card {
      border-radius: 14px;
    {% if (state_attr('media_player.your_receiver','source') or '')|lower == 'cd' %}
      background: linear-gradient(160deg, rgba(226,86,10,0.34), rgba(15,15,17,0.88));
      border: 1px solid rgba(255,122,24,0.80);
    {% else %}
      background: rgba(15,15,17,0.72);
      border: 1px solid rgba(255,122,24,0.14);
    {% endif %}
    }
每个输入源只需改三处:脚本、图标,以及用来比对的字符串。
有两点必须做对,否则磁贴永远不会亮:
source_list 和 sound_mode_list 属性。那才是准确的字符串。如上所示,请用小写比对。Xbox,而 AVR Maestro 的控制项仍叫 input_game1。请按接收机报告的内容来匹配,而不是按脚本名称。环绕声模式是同样的卡片,只是把 source 换成 sound_mode。
单纯的标题是浪费空间。把实时数值放在标题下面,“输入源”就变成了“输入源 / 当前为 Nvidia Shield”。
type: custom:button-card
name: Sources
icon: mdi:video-input-hdmi
color_type: label-card
entity: media_player.your_receiver
show_label: true
label: >-
  [[[ var v = states["media_player.your_receiver"].attributes.source;
      return v ? ("Now on " + v) : "Receiver in standby"; ]]]
tap_action:
  action: none
styles:
  grid:
    - grid-template-areas: '"i n" "i l"'
    - grid-template-columns: min-content auto
  name:
    - font-size: 13px
    - letter-spacing: 3px
    - text-transform: uppercase
    - justify-self: start
  label:
    - font-size: 11px
    - justify-self: start
正是这个两行网格,让标签位于标题下方而不是旁边。
在环绕声标题上,把 attributes.source 换成 attributes.sound_mode,其余依此类推。
Home Assistant 把音量报告为一个小数。没有人会把接收机设为“0.67”。一行数学运算就能解决,整个音量分区读起来就像一台真正的接收机。
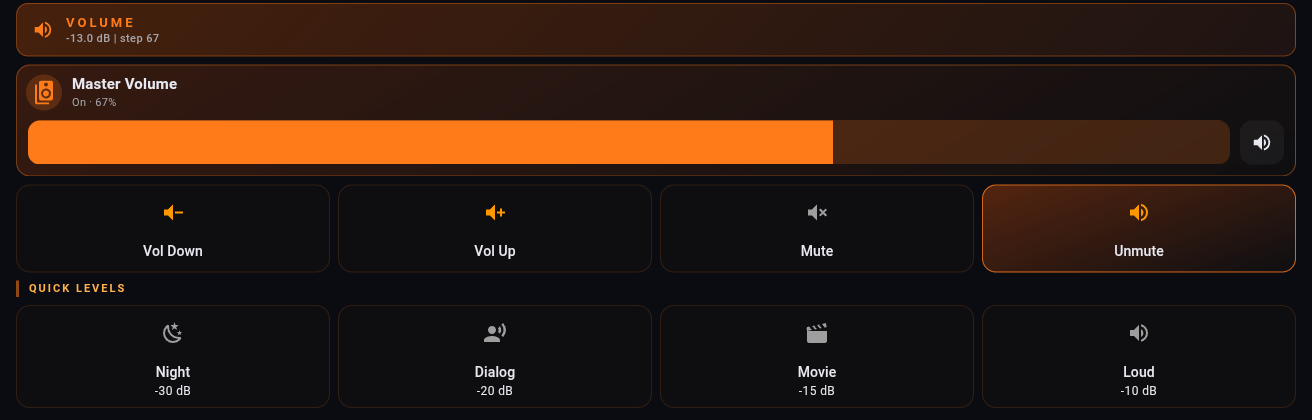
volume_level 发布为主音量除以 100,而在 Denon 和 Marantz 接收机上,MV 80 是 0 dB 参考电平。因此 dB = volume_level × 100 − 80。volume_level 为 0.67 即主音量 67,也就是 −13.0 dB。# The readout
type: custom:mushroom-template-card
entity: media_player.your_receiver
icon: mdi:volume-high
primary: >-
{% set v = state_attr('media_player.your_receiver','volume_level') %}
{% if v is not none %}{{ (v * 100 - 80) | round(1) }} dB{% else %}Standby{% endif %}
secondary: Master volume
layout: vertical
# The slider. media_controls must be empty or the bar becomes a power button
type: custom:mushroom-media-player-card
entity: media_player.your_receiver
volume_controls:
  - volume_set
media_controls: []
show_volume_level: true
# A preset. 0.50 is master volume 50, which is -30 dB
type: custom:mushroom-template-card
entity: media_player.your_receiver
icon: mdi:weather-night
primary: Night
secondary: "-30 dB"
tap_action:
  action: perform-action
  perform_action: media_player.volume_set
  target:
    entity_id: media_player.your_receiver
  data:
    volume_level: 0.50
从脚本中读取名称,而不是手动输入。这样在 AVR Maestro 中重命名场景时,磁贴也会随之更名,无需编辑仪表盘。
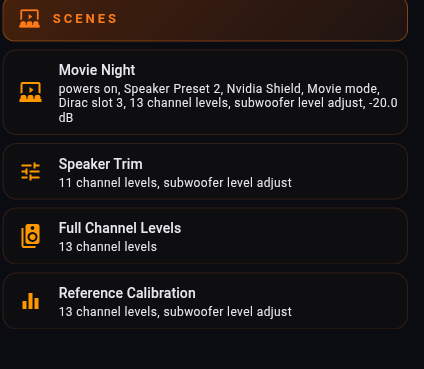
type: custom:mushroom-template-card
entity: script.avr_maestro_MAC_scene_1234567890123
icon: mdi:theater
primary: >-
  {{ state_attr('script.avr_maestro_MAC_scene_1234567890123','friendly_name')
     | replace('AVR Maestro - ', '') | replace(' (Your Receiver)', '') }}
secondary: >-
  {% set t = states.script['avr_maestro_MAC_scene_1234567890123'].attributes.last_triggered %}
  {{ 'recalled ' ~ relative_time(t) ~ ' ago' if t else 'not run yet' }}
multiline_secondary: true
tap_action:
  action: perform-action
  perform_action: script.turn_on
  target:
    entity_id: script.avr_maestro_MAC_scene_1234567890123
两处 replace() 调用会从友好名称中去掉前缀和接收机名称。
多花一分钟加上第二行是值得的。一堵名字很有文艺范儿的按钮墙,在晚上11点什么也告诉不了你;而一行说明各按钮会恢复什么,就能让你知道该按哪一个。
Home Assistant 会像记录其他实体一样记录接收机的媒体播放器实体,因此你可以免费获得收听历史。下面的一切都来自这一个实体:无需额外传感器,无需辅助实体,也无需先做任何配置。
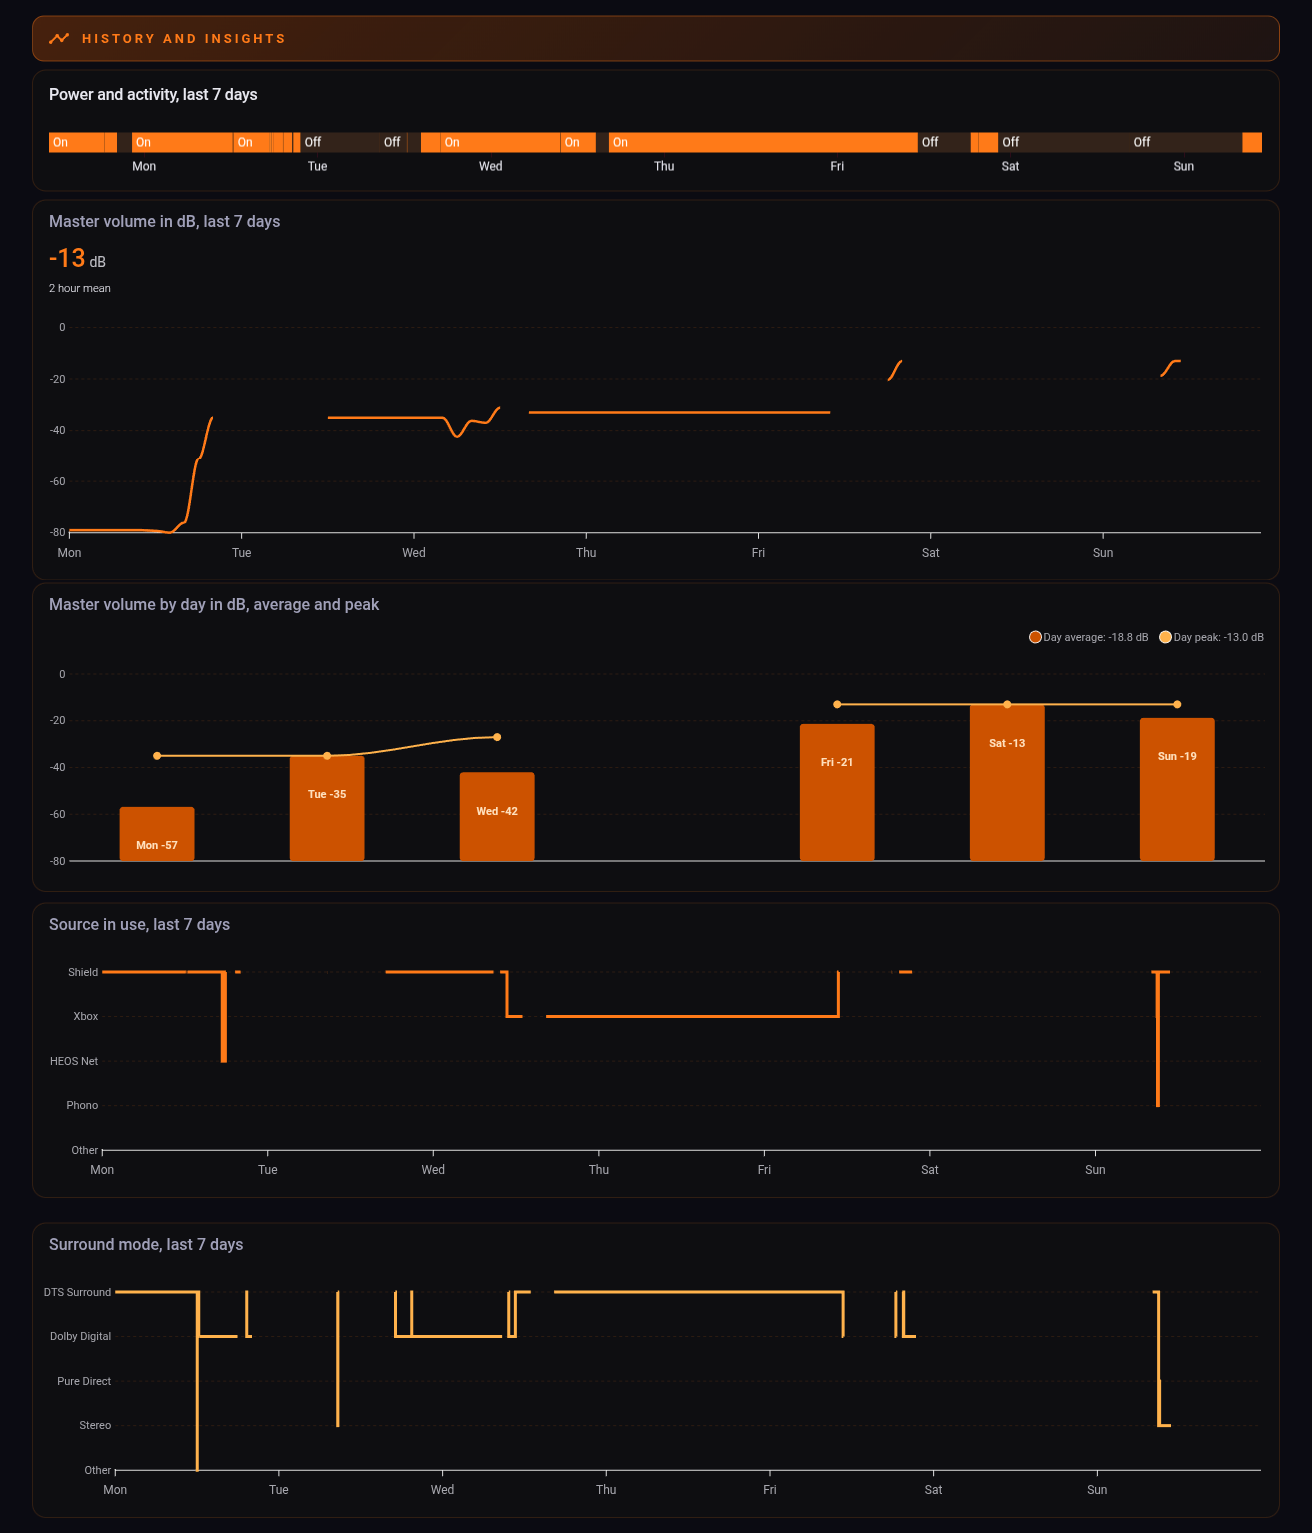
普通的状态时间线完全不需要自定义卡片,也是最值得拥有的一张:
type: history-graph
hours_to_show: 168
entities:
  - entity: media_player.your_receiver
    name: Receiver
开机、关机,以及这一周里它在做什么。
以 dB 计的音量使用与第 7 步相同的换算:
type: custom:apexcharts-card
graph_span: 7d
header:
  show: true
  title: Master volume, last 7 days
series:
  - entity: media_player.your_receiver
    attribute: volume_level
    name: Master volume
    type: line
    curve: smooth
    unit: dB
    float_precision: 1
    transform: "return x == null ? null : Number(x) * 100 - 80;"
    extend_to: now
    group_by:
      duration: 1h
      func: last
      fill: last
apex_config:
  chart:
    height: 240
  yaxis:
    min: -60
    max: 0
带 fill: last 的 group_by 会把零散的事件变成一条连续的线。y 轴必须写在 apex_config 中才会生效。
按日计算的平均值和峰值,会把起伏不定的线变得有形有状:
type: custom:apexcharts-card
graph_span: 7d
span:
  end: day
header:
  show: true
  title: Master volume by day in dB, average and peak
series:
  - entity: media_player.your_receiver
    attribute: volume_level
    name: Day average
    type: column
    float_precision: 1
    transform: "return x == null ? null : Number(x) * 100;"
    group_by: {duration: 1d, func: avg, fill: 'null'}
  - entity: media_player.your_receiver
    attribute: volume_level
    name: Day peak
    type: line
    curve: smooth
    float_precision: 1
    transform: "return x == null ? null : Number(x) * 100;"
    group_by: {duration: 1d, func: max, fill: 'null'}
apex_config:
  yaxis:
    min: 0
    max: 80
    labels:
      formatter: "EVAL:function (v) { return (v - 80).toFixed(0); }"
  tooltip:
    y:
      formatter: "EVAL:function (v) { return v == null ? '' : (v - 80).toFixed(1) + ' dB'; }"
同一个属性生成两个数据系列,按天分组。
fill: 'null' 表示没有读数的一天不会出现柱子,而不是沿用前一天的数值。还有两张用来回答“我平时到底用什么看,用什么模式看”:输入源和环绕声模式,以时间线的形式显示当时选中的是哪一个。
type: custom:apexcharts-card
graph_span: 7d
span:
  end: day
header:
  show: true
  title: Source in use, last 7 days
series:
  - entity: media_player.your_receiver
    attribute: source
    name: Source
    type: line
    curve: stepline
    stroke_width: 3
    extend_to: now
    float_precision: 0
    transform: |
      if (x == null) return null;
      var m = ["Phono", "NET", "Xbox", "Nvidia Shield"];
      var i = m.indexOf(x);
      return i < 0 ? 0 : i + 1;
apex_config:
  yaxis:
    min: 0
    max: 4
    tickAmount: 4
    labels:
      formatter: >-
        EVAL:function (v) { return ["Other", "Phono", "HEOS Net", "Xbox",
        "Shield"][Math.round(v)] || ''; }
  tooltip:
    y:
      formatter: >-
        EVAL:function (v) { return v == null ? 'off' : ["Other", "Phono",
        "HEOS Net", "Xbox", "Shield"][Math.round(v)] || 'Other'; }
把你自己的输入源放进 transform 数组和两个 formatter 数组中。索引 0 保持为“Other”。
图表坐标轴需要数字,所以 transform 把每个输入源名称映射到一个位置,格式化器再把它映射回来,用于标签和提示框。请让映射保持完整:null(接收机关机)保持为空白,而不在你列表中的任何项都归入“Other”,这样两者永远不会混淆。同样的卡片配上 sound_mode 就是环绕声模式,字符串须与接收机报告的完全一致,全部大写。
stepline。输入源或环绕声模式是类别,不是数值。如果把曲线平滑,线条会在 Shield 和 Xbox 之间划过坐标轴上夹在它们中间的所有项,画出一个从未被选中的输入。音量是真实的量,平滑是诚实的;类别则不然。state_class: measurement 模板传感器,Home Assistant 会把它作为长期统计数据保存多年。完整视图,包含所有分区和所有卡片,其中的实体 ID 均为占位符。
YOUR_RECEIVER 换成你的媒体播放器实体名称,把 YOURMAC 换成第 2 步中你接收机的十二个字符。先别急着认为是自己搭错了:有些磁贴本来就无法点亮,了解是哪些很有必要。
磁贴只有在 Home Assistant 能读取状态时才能显示状态,而它从两个地方读取你的接收机。Denon AVR 集成在媒体播放器实体上发布基础信息。其余的由 AVR Maestro 发布:它会创建一个状态桥传感器 sensor.avr_maestro_your_receiver,并把它已掌握的读数作为属性写入其中。
| 在媒体播放器实体上 | 在状态桥传感器上 |
|---|---|
| 电源 | Audyssey MultEQ 曲线 |
| 当前输入源 | Dynamic Volume 与参考电平 |
| 环绕声模式 | 当前加载的是哪个 Dirac 插槽 |
| 音量与静音 | 前面板调光、节能模式 |
| Dynamic EQ,有时可用 | 扬声器预设、音调,以及另外几十项 |
现在两栏都能读取了。媒体播放器的值取自 states['media_player.your_receiver'].attributes,状态桥的值取自 state_attr('sensor.avr_maestro_your_receiver','dirac_slot'),这样磁贴就会为当前真正生效的设置点亮,而不只是触发那个更改设置的脚本。
在搭建本示例所用的接收机上实测:媒体播放器实体承载了六十个控制项中的约二十个,状态桥传感器另外发布了大约四十个。两者合起来,仪表盘几乎能读取它能更改的一切,这就是一堵按钮墙与一个真正控制面板之间的区别。
true、false,也可能根本不出现。把“根本不出现”当作“关闭”,会把一个自信满满的错误答案挂在你的墙上。icon_color: >-
{% set d = state_attr('media_player.your_receiver','dynamic_eq') %}
{{ 'orange' if d is true else 'grey' }}
secondary: >-
{% set d = state_attr('media_player.your_receiver','dynamic_eq') %}
{% if d is none %}state not published{% elif d %}on{% else %}off{% endif %}
三种状态,而不是两种。
grid_options: {columns: 9}。一行六个则设为 6。media_controls 中带有 on_off。请设置 media_controls: []。multiline_secondary: true。experimental.color_threshold 造成的。它以垂直渐变来绘制线条,而一段完全水平的线段高度为零,没有可供渐变的空间,因此渲染为不可见。一次在同一音量下持续 43 小时的会话就这样完全消失了。请改用纯色的 color。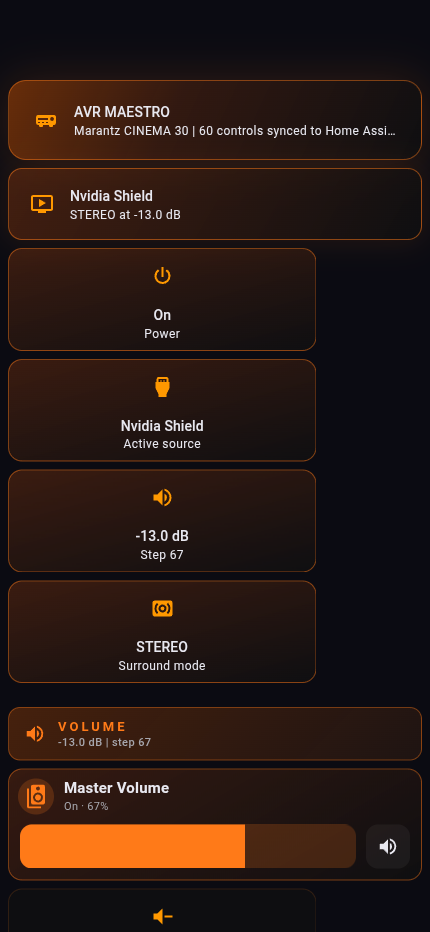
 AVR Maestro


