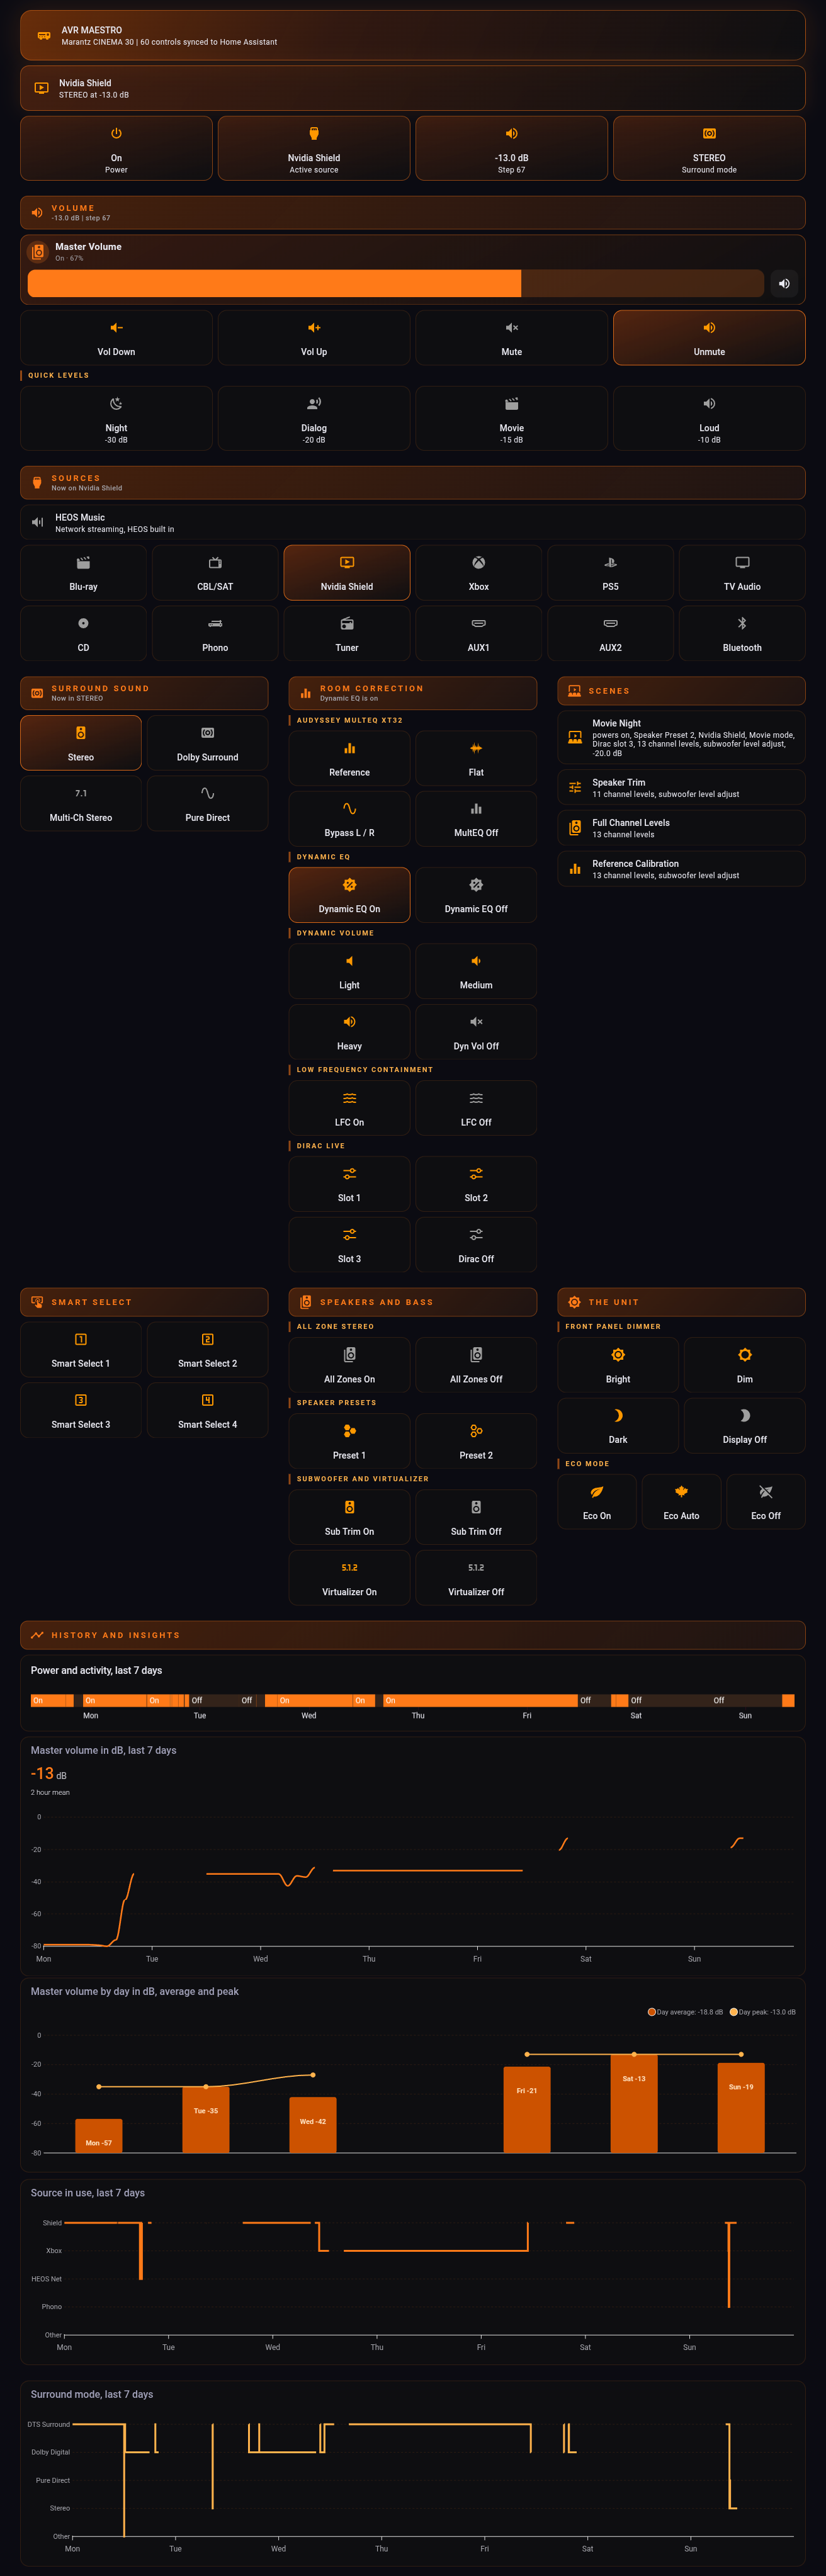
這個儀表板由兩個來源提供資料,下面每個步驟都會用到兩者的差異。
| 來源 | 提供 |
|---|---|
| AVR Maestro 同步的腳本 | 所有控制項。輸入、環繞模式、Audyssey、Dirac、Smart Select、預設值、亮度、ECO 模式,以及您的情境。 |
| Denon AVR 整合的媒體播放器實體 | 即時狀態。電源、已選訊源、環繞模式、音量、靜音。 |
這四張都在 HACS 預設商店中。在 Home Assistant 中:HACS › 前端 › 探索 & 下載儲存庫,搜尋名稱、按下載,然後重新載入瀏覽器。
| 搜尋 | 用途 | 略過的話 |
|---|---|---|
| Mushroom | 所有控制磚,以及音量滑桿 | 改用一般的 button 卡片。可以運作,只是外觀較方正。 |
| button-card | 附即時標籤的區段標題 | 改用 markdown 卡片,或一般標題。 |
| card-mod | 配色,以及使用中控制磚的亮起狀態 | 一切照常運作,只是不會有任何亮起效果。 |
| apexcharts-card | 歷史圖表 | 改用內建的 history-graph 卡片。 |
本頁的每段程式碼都會用到兩個預留位置。只要找出一次,其餘都是複製貼上。
media_player.your_receiver → 設定 › 裝置 & 服務 › 您的接收器 › 媒體播放器實體。名稱大致像 media_player.marantz_cinema_30。script.avr_maestro_MAC_... → 開發者工具 › 狀態,並在實體篩選欄輸入 avr_maestro。您的完整控制清單就會出現。每個腳本 ID 的中間部分都是您接收器的 MAC 位址,十二個小寫字元,且每個都相同。複製一次就好。本頁寫著 MAC 的地方,都換成您自己的。
unavailable 的項目。舊版本是以接收器名稱而非 MAC 位址為腳本命名。如果您當時同步過,這些舊腳本仍會列出,但已失效。有效的是以 MAC 命名的那些。從這裡開始,每個步驟都是:新增區段,然後把卡片貼進去。要貼上 YAML,請使用卡片的三點選單並選擇以 YAML 編輯,或使用儀表板的三點選單開啟原始設定編輯器,一次貼上整份內容。
# The view's own settings, if you prefer to type them
type: sections
title: AVR Maestro
icon: mdi:audio-video
max_columns: 3
dense_section_placement: true
先從版面上最簡單的東西開始,這樣在打造複雜內容之前,就能確認您的實體 ID 是否正確。新增區段、新增卡片、以 YAML 編輯,然後貼上:
type: button
name: Pure Direct
icon: mdi:speaker
tap_action:
  action: perform-action
  perform_action: script.turn_on
  target:
    entity_id: script.avr_maestro_MAC_mode_pure_direct
原生 Home Assistant,不需要 HACS。
點一下它。如果接收器有反應,代表您的 ID 正確,下面的一切都能運作。如果沒有反應,請回到步驟 2。
這是值得學會的模式,板面上每個訊源與環繞磚都是它的複本。卡片會送出腳本,並依據接收器實體為自己上色,因此您目前實際使用的輸入會亮起,其他的則不會。
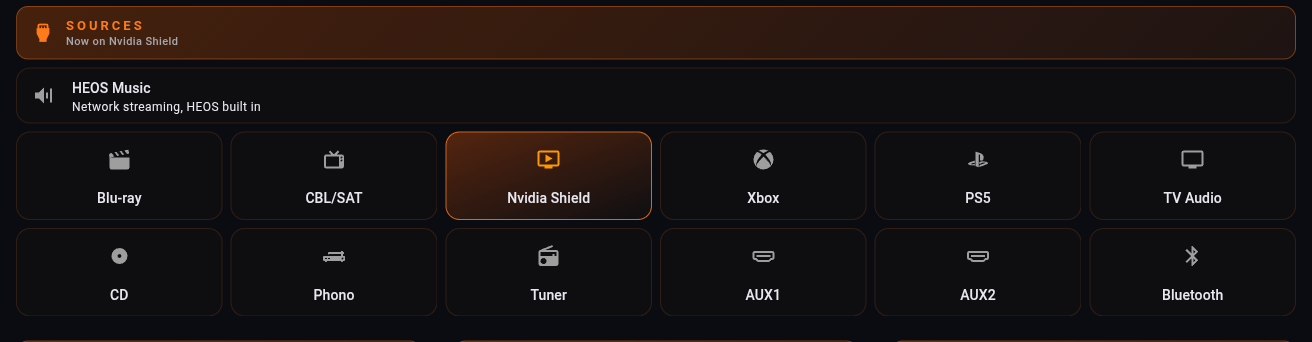
type: custom:mushroom-template-card
entity: script.avr_maestro_MAC_input_cd
icon: mdi:disc
primary: CD
icon_color: >-
  {{ 'orange' if (state_attr('media_player.your_receiver','source') or '')|lower
     == 'cd' else 'grey' }}
layout: vertical
fill_container: true
tap_action:
  action: perform-action
  perform_action: script.turn_on
  target:
    entity_id: script.avr_maestro_MAC_input_cd
card_mod:
  style: |
    ha-card {
      border-radius: 14px;
    {% if (state_attr('media_player.your_receiver','source') or '')|lower == 'cd' %}
      background: linear-gradient(160deg, rgba(226,86,10,0.34), rgba(15,15,17,0.88));
      border: 1px solid rgba(255,122,24,0.80);
    {% else %}
      background: rgba(15,15,17,0.72);
      border: 1px solid rgba(255,122,24,0.14);
    {% endif %}
    }
每個輸入只需改三樣東西:腳本、圖示,以及用來比對的字串。
有兩件事要做對,否則控制磚永遠不會亮起:
source_list 與 sound_mode_list 屬性。那些就是確切的字串。如上所示,請以小寫比對。Xbox,而 AVR Maestro 的控制項仍叫 input_game1。請依接收器回報的內容比對,而不是腳本名稱。環繞模式使用同一張卡片,只要把 source 換成 sound_mode。
單純的標題只是浪費空間。把即時數值放在標題下方,「訊源」就會變成「訊源 / 目前為 Nvidia Shield」。
type: custom:button-card
name: Sources
icon: mdi:video-input-hdmi
color_type: label-card
entity: media_player.your_receiver
show_label: true
label: >-
  [[[ var v = states["media_player.your_receiver"].attributes.source;
      return v ? ("Now on " + v) : "Receiver in standby"; ]]]
tap_action:
  action: none
styles:
  grid:
    - grid-template-areas: '"i n" "i l"'
    - grid-template-columns: min-content auto
  name:
    - font-size: 13px
    - letter-spacing: 3px
    - text-transform: uppercase
    - justify-self: start
  label:
    - font-size: 11px
    - justify-self: start
兩行格狀排列能讓標籤顯示在標題下方,而不是旁邊。
在環繞標題中,將 attributes.source 換成 attributes.sound_mode,其餘依此類推。
Home Assistant 以小數回報音量,但沒人會把接收器調到「0.67」。一行運算就能解決,整個區段讀起來也會像一台真正的接收器。
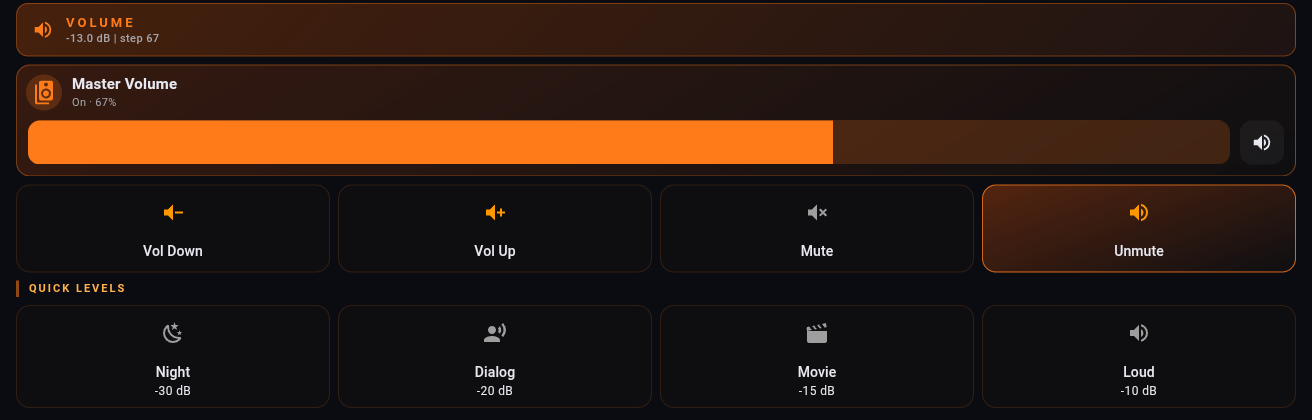
volume_level 以主音量除以 100 的方式發布,而在 Denon 與 Marantz 接收器上,MV 80 就是 0 dB 的基準。因此 dB = volume_level × 100 − 80。volume_level 為 0.67 代表主音量 67,也就是 −13.0 dB。# The readout
type: custom:mushroom-template-card
entity: media_player.your_receiver
icon: mdi:volume-high
primary: >-
{% set v = state_attr('media_player.your_receiver','volume_level') %}
{% if v is not none %}{{ (v * 100 - 80) | round(1) }} dB{% else %}Standby{% endif %}
secondary: Master volume
layout: vertical
# The slider. media_controls must be empty or the bar becomes a power button
type: custom:mushroom-media-player-card
entity: media_player.your_receiver
volume_controls:
  - volume_set
media_controls: []
show_volume_level: true
# A preset. 0.50 is master volume 50, which is -30 dB
type: custom:mushroom-template-card
entity: media_player.your_receiver
icon: mdi:weather-night
primary: Night
secondary: "-30 dB"
tap_action:
  action: perform-action
  perform_action: media_player.volume_set
  target:
    entity_id: media_player.your_receiver
  data:
    volume_level: 0.50
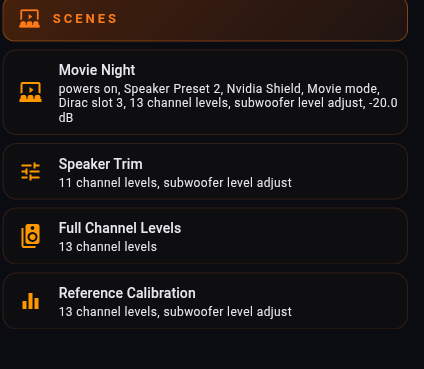
直接從腳本讀取名稱,而不是手動輸入,這樣在 AVR Maestro 中重新命名情境時,控制磚也會跟著改名,不必編輯儀表板。
type: custom:mushroom-template-card
entity: script.avr_maestro_MAC_scene_1234567890123
icon: mdi:theater
primary: >-
  {{ state_attr('script.avr_maestro_MAC_scene_1234567890123','friendly_name')
     | replace('AVR Maestro - ', '') | replace(' (Your Receiver)', '') }}
secondary: >-
  {% set t = states.script['avr_maestro_MAC_scene_1234567890123'].attributes.last_triggered %}
  {{ 'recalled ' ~ relative_time(t) ~ ' ago' if t else 'not run yet' }}
multiline_secondary: true
tap_action:
  action: perform-action
  perform_action: script.turn_on
  target:
    entity_id: script.avr_maestro_MAC_scene_1234567890123
兩個 replace() 呼叫會從好記名稱中去除前綴與接收器名稱。
多花一分鐘加上第二行是值得的。一整面名稱華麗的按鈕,在晚上11點什麼也告訴不了您;而一行說明各按鈕還原內容的文字,能讓您知道該按哪一個。
Home Assistant 會像記錄其他實體一樣記錄接收器的媒體播放器實體,因此您可以免費取得收聽歷史。下面的一切都來自這個實體:不需要額外的感測器、輔助項目,也不用先設定任何東西。
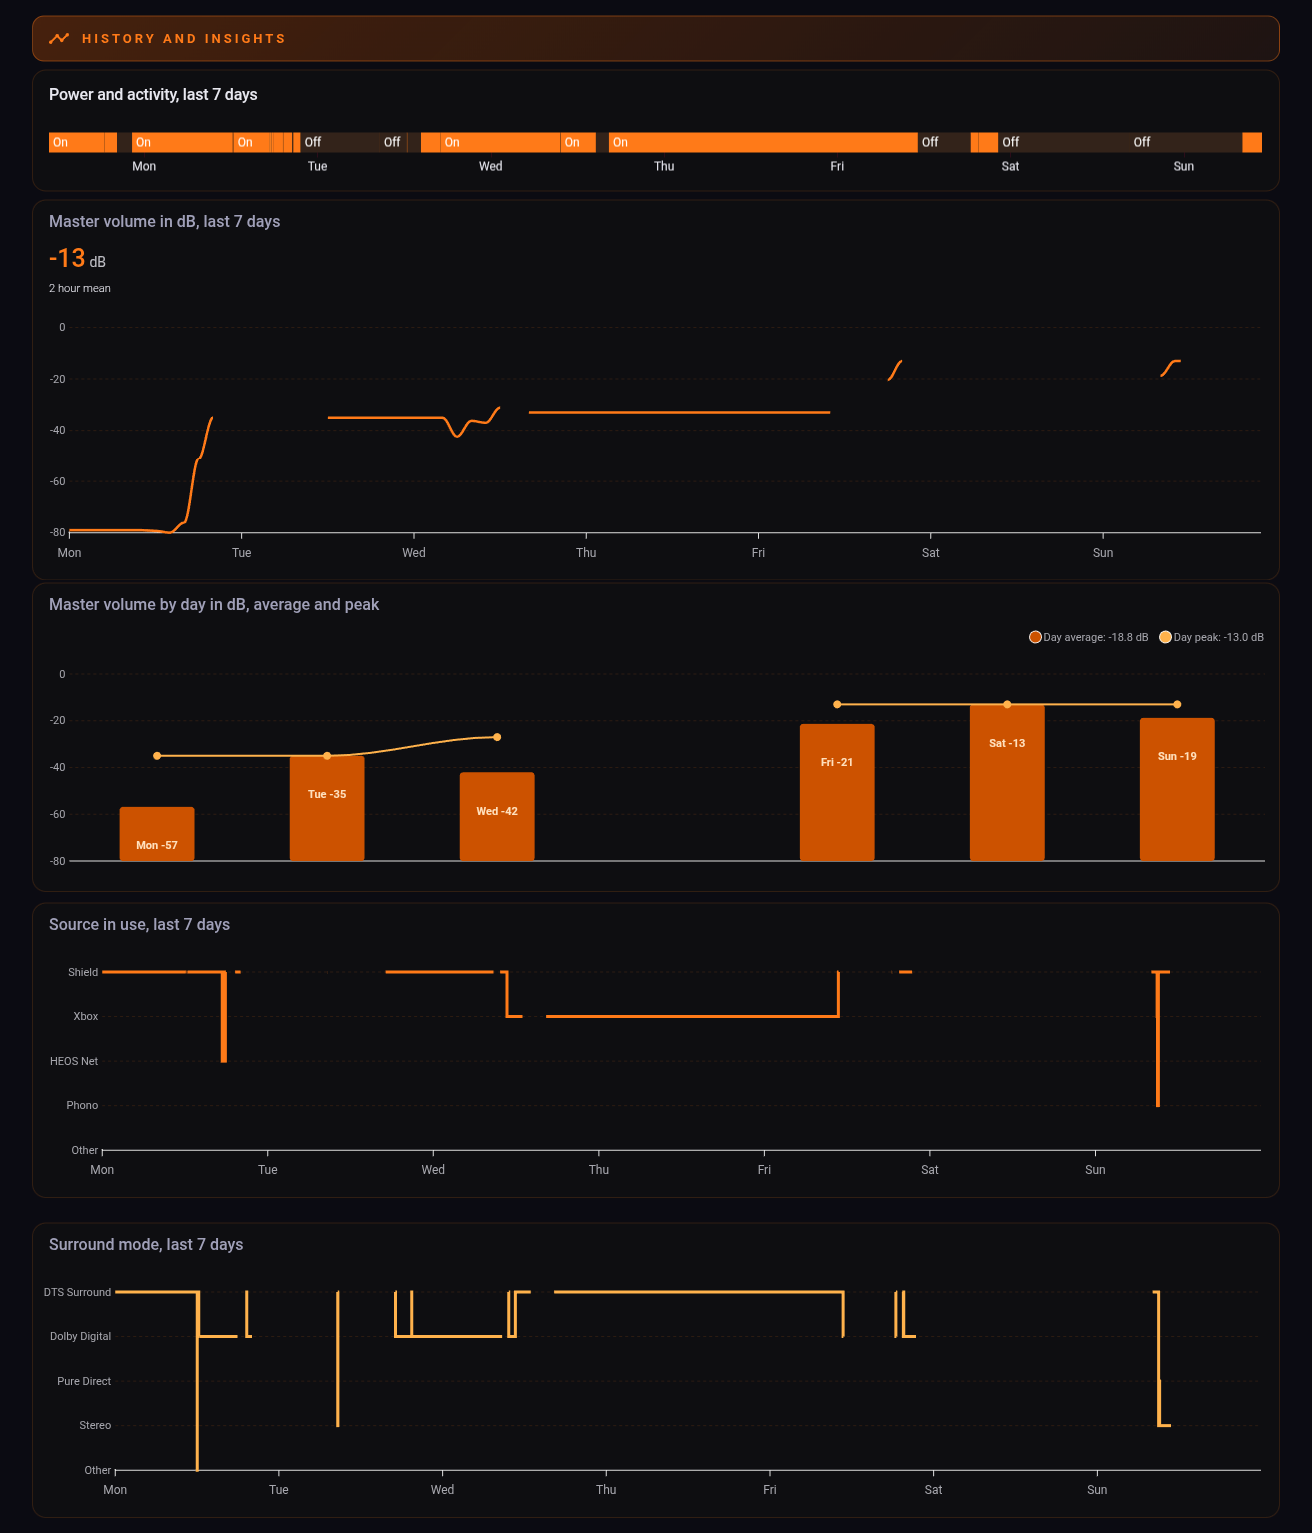
一般的狀態時間軸完全不需要自訂卡片,也是最值得擁有的一張:
type: history-graph
hours_to_show: 168
entities:
  - entity: media_player.your_receiver
    name: Receiver
一週內的開機、關機,以及它在做什麼。
以 dB 表示的音量使用與步驟 7 相同的轉換:
type: custom:apexcharts-card
graph_span: 7d
header:
  show: true
  title: Master volume, last 7 days
series:
  - entity: media_player.your_receiver
    attribute: volume_level
    name: Master volume
    type: line
    curve: smooth
    unit: dB
    float_precision: 1
    transform: "return x == null ? null : Number(x) * 100 - 80;"
    extend_to: now
    group_by:
      duration: 1h
      func: last
      fill: last
apex_config:
  chart:
    height: 240
  yaxis:
    min: -60
    max: 0
group_by 搭配 fill: last 會把零散的事件變成連續的線。y 軸必須放在 apex_config 中才會生效。
每日平均值與峰值,能讓起伏不定的線條變得有形狀:
type: custom:apexcharts-card
graph_span: 7d
span:
  end: day
header:
  show: true
  title: Master volume by day in dB, average and peak
series:
  - entity: media_player.your_receiver
    attribute: volume_level
    name: Day average
    type: column
    float_precision: 1
    transform: "return x == null ? null : Number(x) * 100;"
    group_by: {duration: 1d, func: avg, fill: 'null'}
  - entity: media_player.your_receiver
    attribute: volume_level
    name: Day peak
    type: line
    curve: smooth
    float_precision: 1
    transform: "return x == null ? null : Number(x) * 100;"
    group_by: {duration: 1d, func: max, fill: 'null'}
apex_config:
  yaxis:
    min: 0
    max: 80
    labels:
      formatter: "EVAL:function (v) { return (v - 80).toFixed(0); }"
  tooltip:
    y:
      formatter: "EVAL:function (v) { return v == null ? '' : (v - 80).toFixed(1) + ' dB'; }"
同一個屬性產生兩個數列,依日分組。
fill: 'null' 代表沒有讀數的那一天不會有長條,而不是沿用前一天的數值。還有兩張用來回答「我到底都用什麼來看、用什麼格式」:訊源與環繞模式,以時間軸呈現當時選了哪一個。
type: custom:apexcharts-card
graph_span: 7d
span:
  end: day
header:
  show: true
  title: Source in use, last 7 days
series:
  - entity: media_player.your_receiver
    attribute: source
    name: Source
    type: line
    curve: stepline
    stroke_width: 3
    extend_to: now
    float_precision: 0
    transform: |
      if (x == null) return null;
      var m = ["Phono", "NET", "Xbox", "Nvidia Shield"];
      var i = m.indexOf(x);
      return i < 0 ? 0 : i + 1;
apex_config:
  yaxis:
    min: 0
    max: 4
    tickAmount: 4
    labels:
      formatter: >-
        EVAL:function (v) { return ["Other", "Phono", "HEOS Net", "Xbox",
        "Shield"][Math.round(v)] || ''; }
  tooltip:
    y:
      formatter: >-
        EVAL:function (v) { return v == null ? 'off' : ["Other", "Phono",
        "HEOS Net", "Xbox", "Shield"][Math.round(v)] || 'Other'; }
請把您自己的訊源放進 transform 陣列與兩個格式化器陣列。索引 0 請保留為「其他」。
圖表座標軸需要數字,所以 transform 會把每個訊源名稱對應到一個位置,格式化器再把它對應回來,用於標籤與提示框。請讓對應完整:null(接收器關機)會保持為空白,而不在您清單內的項目則歸入「其他」,因此兩者絕不會被混淆。同一張卡片搭配 sound_mode 就能得到環繞模式,字串請照接收器回報的方式使用大寫。
stepline。訊源或環繞模式是類別,不是數字。若將曲線平滑化,線條會在 Shield 與 Xbox 之間穿過座標軸上夾在中間的任何項目,畫出一個從未被選過的輸入。音量是真實的量,平滑處理是合理的;類別則不是。state_class: measurement 範本感測器,Home Assistant 會將它以長期統計資料的形式保存多年。完整的檢視,包含每個區段與每張卡片,以預留位置取代實體 ID。
YOUR_RECEIVER 換成您媒體播放器實體的名稱,YOURMAC 換成步驟 2 中您接收器的十二個字元。在懷疑是自己做錯之前:有些磚本來就無法亮起,知道是哪些很有用。
磚只有在 Home Assistant 讀得到狀態時才能顯示,而它從兩個地方讀取您的接收器。Denon AVR 整合會在媒體播放器實體上發布基本資訊。其餘由 AVR Maestro 發布:它會建立一個狀態橋接感測器 sensor.avr_maestro_your_receiver,並把它已掌握的讀數以屬性的形式寫入其中。
| 在媒體播放器實體上 | 在狀態橋接感測器上 |
|---|---|
| 電源 | Audyssey MultEQ 曲線 |
| 已選訊源 | Dynamic Volume 與參考音量 |
| 環繞模式 | 目前載入的 Dirac 槽位 |
| 音量與靜音 | 前面板亮度、ECO 模式 |
| Dynamic EQ,有時可用 | 喇叭預設、音調,以及其他數十項 |
現在兩欄都能讀取。媒體播放器的值取自 states['media_player.your_receiver'].attributes,狀態橋接的值則使用 state_attr('sensor.avr_maestro_your_receiver','dirac_slot'),這樣磚就會為實際啟用中的設定亮起,而不是只會觸發改變它的腳本。
以打造此範例的接收器實測:媒體播放器實體提供約六十個控制項中的二十個,而狀態橋接感測器另外發布約四十個。兩者合計,儀表板幾乎能讀取它能更改的一切,這正是一面按鈕牆與一個控制介面之間的差別。
true、false,或根本沒有。把「根本沒有」當成「關閉」,只會在您的牆上顯示一個信心滿滿的錯誤答案。icon_color: >-
{% set d = state_attr('media_player.your_receiver','dynamic_eq') %}
{{ 'orange' if d is true else 'grey' }}
secondary: >-
{% set d = state_attr('media_player.your_receiver','dynamic_eq') %}
{% if d is none %}state not published{% elif d %}on{% else %}off{% endif %}
三種狀態,而不是兩種。
grid_options: {columns: 9}。一列六個則設為 6。media_controls 裡面有 on_off 的緣故。請設定 media_controls: []。multiline_secondary: true。experimental.color_threshold 造成的。它以垂直漸層繪製線條,而完全水平的線段高度為零,無法在其上做漸層,所以會變成看不見。一段 43 小時、音量固定的連續使用就這樣完全消失了。請改用純色的 color。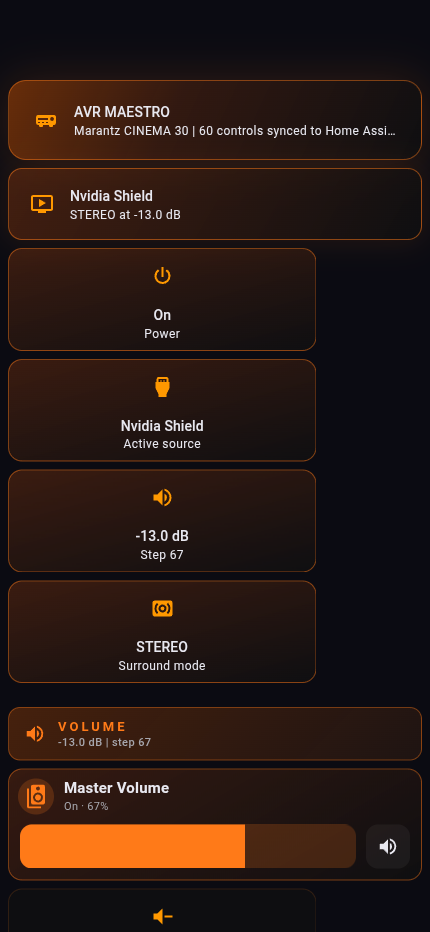
 AVR Maestro


